")
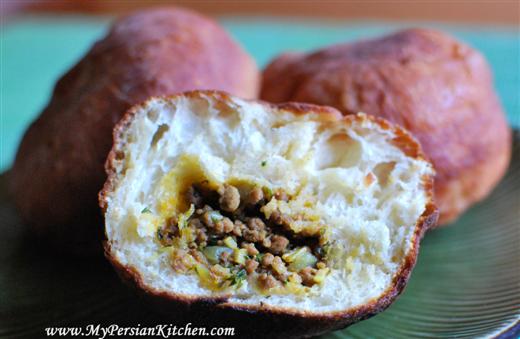
I think it’s pretty safe to say that there are a number of people who will be very happy to finally see this post. With this said, I present to you my first Pirashki post!
The past three four weeks have been kinda busy around here and I might have also felt a bit burned out with all the cooking and driving back and forth to San Diego three weekends in a row. A couple of days ago I decided to take the afternoon off and listen to a couple of food podcasts on my ipod while going through 3 very large cookbooks passed on to me by my friend Cathy. My heart skipped a beat when I read the following article in the Culinaria: European Specialties volume 1
Pirogi: The Acid Test for the Housewife
The acid test for the Russian housewife is her ability to cook pirogi, lavish pastries which vary considerably in size. It is no accident that the pirog also plays an important role at weddings. Newlyweds in the country have to bake a pirog the day after their marriage, which they then offer to their guests with a glass of wine. Every guest is required to try the pirog, to sample the wine, convey their best wishes and to place a present of money on the tray. Often a kurnik is served at a Russian wedding, which is a large pirog with several fillings, although chicken is always used.
There are countless types of pirogi: open and closed ones, small and large, round and square, baked and fried, sweet and sour pirogi. The most varied ingredients are used as fillings. A pirog is therefore always a secret — on the one hand because the pastry does not always turn out the same, and on the other because of the filling, which cannot be seen in an enclosed pirog. Russian housewives like to put their individual mark on pirogi, pricking small rows of holes in the pastry with a fork in a kind of code, so that the number of holes provides information about the filling.
The kulibiaka is a particularly large pirogi. It is a huge pastry which will more than fill ten people at the time. The classic recipe uses a stuffing of fish and rice, but a mushroom filling is also popular.
I personally found the information above very fascinating. I am always completely intrigued and fascinated with food stories such as this.
Now moving on to the recipe. I decided to play it safe and use the recipe that Mahnaz Khanoom left in the comments section of the first post I wrote about Pirashki. So first and foremost a big thank you to Ms. Mahnaz for sharing her recipe with all of us!
Ingredients
1 pkg yeast
1 cup warm water
1 tbsp sugar
1/2 tsp salt
3 tbsp oil
1 cup yogurt
2 eggs
2-3 cups flour
Filling
1/2 lb ground beef
1 small onion
2 cloves garlic
1/4 tsp turmeric
1 tbsp tomato paste
1 cup parsley
oil
salt & pepper
")
Combine warm water (100°) with sugar and mix well. Add yeast and let stand for 5 minutes.
")
Add salt, oil, yogurt and eggs.
")
Mix them all well together.
")
Add 1 cup of flour at a time. Add more flour if needed. Kneed for a few minutes. The dough should be smooth and not stick to your hand. Cover and let rest for one hour.
I should add at this point that my dough came out pretty moist and I needed more flour. I used yogurt that I bought from a regular grocery store which was on the liquid side and not firm like yogurt found at Persian stores. I have a feeling this makes a big difference.
")
In the mean time, small dice onion and mince garlic. Sauté in oil until translucent. Add turmeric and let cook for about one more minute.
")
Add ground beef and season with salt and pepper.
")
Once the meat is browned, add tomato paste and small chopped parsley. Mix well and cook uncovered until all the juices are absorbed. Remove from heat and allow to cool.
")
During the hour that the dough rested you will notice that it has rose a bit.
")
Divide up your dough in small even balls the size of a small orange. I was able to get 9 out of mine.
")
Place each dough ball on your hand and carefully expand. Add a couple of tablespoons of the filling and wrap the dough around the filling making sure that there are no holes. Place back on the cutting board seam side down.
")
Warm some vegetable oil in a pot and fry dough on both sides until golden brown.
")
As I was frying them away I had to do a quality control inspection. Mighty good! I was very impressed with myself since this was my very first try.
")
3.5 Pirogi found a very happy place in my tummy. The rest the Sous Chef devoured before anyone else could get to them! I think he might have really liked them. But then again, one must give it to the Russian; seriously, how can one go wrong with dough stuffed with a delicious meat stuffing and then fried?
Piroshki Stuffed with Ground Beef
Ingredients
1 pkg yeast
1 cup warm water
1 tbsp sugar
1/2 tsp salt
3 tbsp oil
1 cup yogurt
2 eggs
2-3 cups flour
Filling
1/2 lb ground beef
1 small onion
2 cloves garlic
1/4 tsp turmeric
1 tbsp tomato paste
1 cup parsley
oil
salt & pepper
Combine warm water (100°) with sugar and mix well. Add yeast and let stand for 5 minutes. Add salt, oil, yogurt and eggs. Mix them all well together. Add 1 cup of flour at a time. Add more flour if needed. Kneed for a few minutes. The dough should be smooth and not stick to your hand. Cover and let rest for one hour.
In the mean time, small dice onion and mince garlic. Sauté in oil until translucent. Add turmeric and let cook for about one more minute. Add ground beef and season with salt and pepper. Once the meat is browned, add tomato paste and small chopped parsley. Mix well and cook uncovered until all the juices are absorbed. Remove from heat and allow to cool.
Divide up your dough in small even balls the size of a small orange. Place each dough ball on your hand and carefully expand. Add a couple of tablespoons of the filling and wrap the dough around the filling making sure that there are no holes. Place back on the cutting board seam side down. Warm some vegetable oil in a pot and fry dough on both sides until golden brown.


May 10, 2010
Might have to try this one.
May 10, 2010
Meade, you might have to report back to me your experience!
May 11, 2010
I didn’t know that such a wonderful cookbook serie existes!
I like reading about food stories too and to know about food tradition of other countries…It is why I love your blog so much!
I’ll buy all the serie soon!
You know, I’d like to try every recipe in your blog…persian cuisine is so amazing! There just a little problem, I’m vegetarian, so I will have to change some recipes…
I already tried Mirza ghassemi, Borani Bademjan, Kashkeh Bademjan (unfortunately with sour cream) and Khoresht Karafs without meat and they were all yummy!
May 11, 2010
Looks delicious… Can you bake them?
May 11, 2010
@ Mika, thank you for your kind words. I find both of the volumes to be very charming and informative. I am trying to balance my post so that I have plenty of vegetarian choices. But I am so happy to hear that you have made so many dishes so far!
@ Sylvia, I think you should be able to bake them. I am actually going to try it myself because the amount of oil used freaked me out. 🙂
May 11, 2010
My mother and I were just reminiscing about the piroshkis at Dizin. From what I remember there was a little shed there and these beautiful little packages were the best snack after a bit of skiing.
May 12, 2010
Hello,
I am glad that your pirashkies turned out good. You also can divide the dough in smaller sizes and roll them out like a circle, put the filling in the center and do the rest.
Yes, you can bake them, I tried them and they turn out good too. Just brush some oil on the top after arranging them on the baking pan.
Nooshe Jaan.
May 12, 2010
Mahnaz Khanoom, thanks so much for your recipe and your guidance!! I will follow your suggestion of rolling them out next time! 🙂
May 19, 2010
my husband has been asking me to make this, though what he describes sounds like the dough is more like a crepe sort of thing. does that sound like anything you’ve ever heard?
May 19, 2010
Kim, possibly. My grandma used to make crepes and then filled them with some type of meat or chicken casserole. It was so good. Maybe they are the same? I don’t know….
May 20, 2010
I guess this will take a little more looking into! I have a couple of cookbooks i ordered from iran i can check, though i have to wait for my husband to read them to me : ) i can also consult my in laws. I’ll keep you posted.
May 20, 2010
Please do keep me posted! 🙂
May 29, 2010
My husband and I are making a double batch for dinner tonight. THanks for sharing!
August 8, 2010
THANK YOU THANK YOU THANK YOU!!
My husband has been in the US a long time and is always telling stories of the wonderful food he remembered when he was a boy. Roasted sugar beets, the wonderful breads and pirashki! I am a pretty good cook so I began naming other foods which may be similar. The closest I came was from a Checkz bakery and meat filled Kolachies. His eyes light up when I made them but after he tasted he said so close. He found this posting and he was very excited and wanted to know when I was going to make them for him. My first question was why dont you make them for ME you know how they are supposed to look…We laughed and I tucked you website into my favorite file for a special day..Well TODAY is the day! I have been cooking Persian food for him since we married 8 years ago. My specialties are Southern , Cajun and now Persian. He is happy 8>0
Wish me luck!
August 8, 2010
Janelle, I loved reading your comment!! I hope the Pirashki is a success today!!! 🙂
September 18, 2010
is there a way to replace the yogurt with a non dairy ingredient?thank you!!
November 1, 2010
Bah Bah! I will have to try and make these. I was lucky enough to have a russian great aunty, we called her Lusik but she was really Ludmila..the taste of her pirashki’s still lingers in my mouth. Her recipe sounds very like the one here. We also used to get ones that were made with a spring roll type of dough fron the Naft Club in Ahvaz which were deliciously spicey!
November 1, 2010
Maybe the crepe style ones were made with lavash bread? I have to try… Those were the ones we used to eat.
November 20, 2010
Wow! You never cease to amaze me! Like a Genie out of the bottle! When I started reading the recipe, all my juices were flowing and talking about, the heart missing a beat!
I was around 8 or 9 years old, as a special treat my mother always took me to a wonderful Armenian Cafe in the heart of Lalezar Street (similar to todays Oxford St. in London). The name Lalezar (meaning graced with Tulip) has a beautiful story which I leave for some other time. This cafe, had the most exquisite garden with fountains surrounded by colorful fragrant roses. Girls and boys with starched white apron would serve us the sweet and savory Pirashki and afterwards for desert, the best ice cream in the world. I wonder if that place still exist. Thank you for the recipe and bringing back one of my favorite childhood memories.
March 4, 2011
Hi Sanam!
Omid and I are making your pirashkis right now. We learned our lesson last time and doubled up on the recipe (they went fast last time!).
Thanks again for sharing all your great recipes!!
Erin 🙂
March 4, 2011
@ Erin, yay!!! I need to make those again!!! Have one for me too, OK??!!
March 10, 2011
I have been trying most of your recipes and they have been coming out great thanks to you I must say :). This one I was a bit scared of because of the dough process but to my surprise it wasn’t that difficult thank you soo much again.
December 18, 2012
Hi . My mother used to make German dish just like this but she baked it and then she would put sauerkraut in it .
April 6, 2013
Craving your pirashkis today! Gathering all the ingredients now!!☺
April 8, 2013
Erin, I have been craving it too!!! I need to make it again!
November 7, 2013
What can I substitute instead of yogurt?
November 11, 2013
Shaily, I don’t know enough about bread baking to suggest a substitute for yogurt. Sorry..
April 23, 2015
Can you bake them instead of frying?
May 25, 2015
Shazia, I suppose you can try baking them and see how they come out. But traditionally they are fried.